Tuesday, November 30, 2010

Retro Kitchen: Alphabet Soup

On the train ride in this morning I was trying to get inspired by type. Specifically type that conveyed elegance, refinement, and class. While casually scanning Etsy I noticed lots of sans serif fonts. 

2 Vintage Stackable Italian Soup Bowls
As it was a cold morning, soup and chili captured and held my attention. (The perfect decor if we were opening a soup counter truck.)

Unlike the Lincoln BeautyWare or GarnerWare labeled canisters, the fonts on soup and chili bowls tended to be more casual and more frequently paired with muted earthen colors. 
Vintage Soup Mug - Olive Green Ceramic, Stoneware - Made in Japan
Image courtesy of Rainy Penguin Vintage

If you're looking for vintage casual dining that reminds you of homecooked meals or are throwing a soup-themed potluck/cook off/shower, do a little digging on Etsy. Green mugs ranged in price from $7.25 via Honey Brown Vintage to $9 via Rainy Penguin Vintage to $14 via The Vintageholic Frog for one soup mug. Read descriptions carefully to see whether or not the bowls are still food safe.

Some vendors offered two or more mugs of the same color or different. 
Soup Mugs
Autumn Always offered green and orange soup mugs for $14.
Set of 2 Matching Soup and Crackers Large Mugs
Recycle Buy Vintage offered two tan mugs for $16.99.
GRAPHIC TYPOGRAPHY Set of 3 Soup Bowls
Gallivanting Girls offered three tan soup mugs for $18.

Retro VINTAGE 1970s Stackable Chili Mugs in Mint Green
Vintage Caravan offered two chili mugs for $14.

Type was also frequently paired or filled with clip art vegetables.
1970s Hot Veggie Soup Mugs. Yummy Lunch For Two
Image courtesy of Surrender Dorothy$10.89 for two

Vintage Soup Bowl
Image courtesy of Jape$10 

Again, prices vary. 
Vintage - 1970s Ceramic SOUP Mugs - Set of Two (2)
Image courtesy of L8R - G8R Vintage Finds

L8R - G8R Vintage Finds offers two mugs for $8Lizardous offers the top and bottom mugs separately for $8 each. And Autumn Always offers a similar mug for $6.

Veggie Soup Mug

Monday, November 29, 2010

Ingredients: Meyenberg's European Style Goat Butter

There are some sauces that just don't taste quite the same when you "substitute" Earth Balance for butter. Take for instance Chanterelles. While lovely when sauteed in olive oil or Earth Balance or a mixture of olive oil and Earth Balance, Chanterelles really come alive when sauteed in butter.

Imagine the day before Thanksgiving shopping rush at Bi-Rite. On one side you have the checkout counter, followed by the meat counter/butcher shop, on the other side fresh veggies followed by cheeses and wine. In between the two sides are center display units with fruit, bread. The aisles are maybe two people wide. Everyone's goal is get in, get out, quick. 

We came armed with a list. Luckily though we get distracted easily. This time truffles called. White truffles.

How are truffles related to butter? Here's how: the flavor of truffles is best showcased by cream or cheese sauces. Soy milk and Earth Balance just don't cut it. So back to the dairy case I went in search of something that would complement the truffles. And that's when I discovered Meyenberg's European Style Goat Butter. Two recipes changed right then and there as I stood in front of the case: the Wild Mushroom Fricassee (adapted from James Peterson's recipe in Vegetables) and our Vegan Mushroom Gravy. 

Long story short. If you're unable to use butter made from cow's milk, Meyenberg's European Style Goat Butter is a good substitute for savory dishes. It's flavor isn't as subtle as cow's milk butter, but it's great with wild mushrooms and truffles. As long as we can find it locally it's going to have a regular home in our refrigerator.

More on our Vegetarian White Truffle Gravy in a later post, but let's just say it didn't use any Earth Balance or Soy Milk.

Tuesday, November 23, 2010

Retro Kitchen: Cookbook Designs

Last week I was pondering a redesign of our cookbooklets, favoring a 1950s vintage feel. This week I'm still thinking about design. But I'm also thinking about supporting content and how it should be organized. A cookbooklet shouldn't just present a recipe. After last week's class, I realized the why for a crucial step should be present.

Do you have any cookbooks that you love the design and layout of? Tell me which ones and what you love about them.

Here are some more vintage cookbook designs that caught my eye.
The Particular Cook's Cook Book The Particular Cook's Cook Book
The Particular Cook's Cook Book from Borden's Evaporated Milk, sold for $7.50

Elegant 101 SALADS FOR THE GOURMET cook book mid century 1954
101 Salads for the Gourmet, Copyright 1954, listed for $8

look no further vintage cookbook
Look No Further, Copyright 1955, $19.95

Two Super Clean Fifties Recipes Booklets, Metropolitan Life Ins., Lots of Cute Clip Art
Metropolitan Life Insurance Cook Books, listed for $10.95


1950 Culinary Art Institute Encyclopedic Cookbook
Culinary Arts Institute Encyclopedic Cookbook, Copyright 1950, listed for $22

1950's Your Kitchen Keyboard of Spices Guide from R.T. French Co.
Your Kitchen Keyboard of Spices, from R.T. French Co, listed for $17
Update 7/16/2011: Past the initial ideas for look and feel of our cookbooklets and which recipes to include, we haven't done much more until recently. With our nine month anniversary behind us, we're finalizing the design and writing about the process of Designing a Retro Cookbook.   

Credits: Product images taken by their respective Etsy sellers: Sugar and MeringueOddity and WhimsyLivingston and PorterKelley Street VintageMrsOtter06JenZee09

Monday, November 22, 2010

Review: Gourmet Retreats at Casa Lana

We're back! Our mini-moon was everything we wanted. We dined. We cooked. We relaxed. We indulged. 

You might remember that one of our must haves for our mini-moon was a Cooking or Wine Appreciation Class. We achieved this must have, spending 3 days of our mini-moon at Casa Lana's Gourmet Retreats. Our two main criteria (after location and value) for selecting a class were hands-on instruction and solid coverage of knife skills and basic techniques. We practiced knife skills - I learned consistency in size of cuts (something I tend to not always do). I learned what a food processor is for and how to use it. We discovered our sauce techniques were a little faulty with incorrect oil choices and poor ordering of ingredients. (Chicken with Lemon Caper Sauce Take 3 here we come! Based on the color and consistency of the sauce and comments about overbrowning the garlic, any idea on what we did wrong? Hint: It involves both the type of oil and more importantly the pan.) 

First off let me say that a true hands-on cooking experience can be a little overwhelming. We had 7 people in our class, broken into two 2-person teams and one 3-person team two of the days and three 2-person teams and a solo station the last day. Lana went over every recipe/technique with the group so that we'd know the intent of a recipe as well as the why for certain steps and ordering. 

The first day our station was responsible for the salad and vinaigrette, the grilled bread, and the pesto. Now for someone who already knew how to work a food processor (yes I know), this would have probably been a less daunting station. Luckily other students helped us out. The second day we were easily distracted as there were a lot of components that required set cooking times (artichokes, poached pears, chicken, etc.) and we shifted between stations depending on what we were interested in working on. The third day we were all on task and responsible for a particular component. The baking station had the most challenging day in terms of coordination while the sauce station had the most laid back. cubes and I both had different areas we wanted to focus on so we paired up on day one but switched up teams on day two and three. I was determined to become friends with a food processor (something that when we get one and you sample our pesto and romesco you can be the judge of). 

Overall score: A-
  • Pluses: Hands-on instruction; focus on specific trouble areas until mastered; detailed take away notes; discussion of the science and intent of recipes; consideration of allergies in menu. You can tell Lana loves what she's doing. She makes sure you get comfortable with techniques so that you can do them on your own when you go home.
  • Cons: Pacing of class a little too fast in spots (first day where we were trying to get ingredients blanched, cooled, bread grilled, vinaigrette emulsified, pine nuts toasted, pesto made, salad dressed and plated).
Day 1 - The Results of Our Work: Let's Eat! Minestrone Genovese served with a dollop of Pe
Day 1 - Arugula, Radicchio, and Endive Salad with Shaved Goat Cheese and Myer Lemon Vinaigrette
Day 1 - Grilled Bread
Day 1 - cubes plates his Fruit Tian
Day 2- Aioli
Day 2 - Steamed Artichokes
Day 2 - Pan-Seared Chicken with Wine Reduction Sauce, Toasted Barley Risotto & Sauteed Leafy Greens
Day 2 - Spiced Apple-Cranberry Crisp (Dairy-Free)
Day 2 - Spiced Apple-Cranberry Galette
Day 3 - Grilled Vegetables
Day 3 - Romesco
Day 3 - Potato and Herb Frittata

Day 3 - Grilled Flatbreads with Goat Cheese, Cherry Tomatoes, and Basil

Day 3 - Spiced Wine Poached Pears with Zabaglione and Hazelnut Biscotti

Thursday, November 18, 2010

Review: Taylor's Connoisseur Instant Read Thermometer

After careful consideration, we chose two items from CSN Store Cookware.com to review. The first item was the Taylor 501 Connoisseur Instant Read Thermometer for $15.99. 

As mentioned earlier, we already own a thermometer. We just weren't sure if it was a meat thermometer or an instant read thermometer. Luckily, we were able to locate the product instructions for the thermometer we already owned and find out. Our other thermometer is a Good Cook's Meat Thermometer. So we decided to purchase an instant read thermometer over another meat thermometer. If you're wondering about the differences, check out our Tips post.

We tried out the Taylor 501 Connoisseur Instant Read Thermometer for our one month wedding anniversary celebration. Unlike the meat thermometer we'd been trying to use for instant reads in the past, the thermometer does read the initial temperature of the meat faster. 


While we saw browning of our chicken we didn't see noticeable changes in the temperature readings. Thinking our Taylor instant read thermometer might be defective, we pulled out our Good Cook Meat Thermometer. 


It confirmed the reading of the Taylor thermometer and showed increases in the temperature as the cooking progressed. The instant read thermometer, however, didn't measure increases in temperature as well as the meat thermometer. I think this is probably because you're supposed to remove the instant read thermometer in between reads rather than leave it in.

Both thermometers stopped at roughly 150 degrees. We finally removed the chicken from the pan and sliced one open. The juices ran clear and the meat was white - although a tad overcooked. (Hel'um has a good description of how to tell if your chicken is completely cooked and safe to eat.)  This would lead me to believe that our thermometer is probably off by about 15 to 20 degrees. 

Unfortunately the Taylor instant read thermometer we purchased doesn't appear that it can be calibrated. Other instant read thermometers from Taylor, such as the 560 Gourmet Instant Read Thermometer and 801 Weekend Warrior Instant Read Thermometer, can be. Poor calibration doesn't make the thermometer useless it just means you have to mentally note the difference and take that into account each time you make a measurement.

Based on the calibration, I'd recommend not purchasing this particular instant read thermometer or any thermometer that doesn't have a way to adjust the calibration.

NOTE: We received the products from CSN Store Cookware.com to review free of charge. There were no restrictions on which product(s) we chose. The opinions contained herein are entirely our own.

The Couple Who Ate The Wine Country: In Search of The Perfect Meal

Everyone who knows us or our friends has heard of or experienced first hand our love of food. So when better to expand our culinary expertise and delight our taste buds than on our honeymoon? 


Our quest is to eat the wine country in search of the perfect meal. We'll be armed with fresh culinary knowledge, gained at Casa Lana's Gourmet Retreats in Calistoga, CA as we take four local eateries by storm. The venues in alphabetical order by city are as follows:


Matthew Spector
Image courtesy of StarChefs
JoLé, Calistoga, CA
One night we'll stop for dinner at JoLé (inside the Mount View Hotel): 1457 Lincoln Avenue, Calistoga, CA 94515-1417. We'll work up an appetite with a brisk short walk (two tenths of a mile) from our cottage to our table. After a long day, we won't have to worry about dressing up as recommended attire is casual dress.

JoLé opened in June 2008 and is the owners' - a husband and wife pair, Matthew and Sonjia Spector - second restaurant (Matyson in Philadelphia was their first). While Matthew was named by StarChefs as a Rising Star Chef in 2009, this relatively new restaurant has yet to earn a star from Michelin (its portions are tapas-sized and range in price from $10 to $15 per plate, placing it outside Bib Gourmand's criteria.) It is definitely a local favorite though. Local Wally calls JoLé's Tasting Menu "the Calistoga version of The French Laundry experience, only much cheaper." And BiteClubEats felt JoLé, along with Rosso Pizzeria & Wine Bar (run by John Franchetti, formerly the pizza maker at Tra Vigne) and Restaurant Eloise (its chefs New Yorkers Eric Korsh and Ginevra Iverson were also named Rising Star Chefs in 2009. They closed the restaurant November 29, 2009 and have returned to New York according to ChefDB), should have been considered by Michelin for their 2010 Guide. 

Solbar
Photography Credit: Antoinette Bruno via StarChefs

Solbar, Calistoga, CA
We'll pop into Solbar - which opened in June 2007 and is the first restaurant in Calistoga to earn a Michelin star - one day for lunch. Recommended attire is smart casual, which according to Love to Know Men's Fashion "means that you dress professionally, but you are relaxed. It is a middle ground between strict business or formal wear and street clothes." As we're lunching at Solbar, jeans and pumas should be ok.

35-year old Executive Chef Brandon Sharp and his culinary team first received their star in 2010 and again this year. Brandon joined Solbar in 2006, leaving Gary Danko in San Francisco where he was Sous Chef. Locally, in addition to Gary Danko, he also worked with Thomas Keller at French Laundry as Chef de Partie. Brandon received his education at The Culinary Institute of America, Hyde Park, NY.  

Lucky Pig: Slow Roasted Shoulder of Long and Bailey Duroc Pork, Black Sesame Crepes, Pickled Pineapple, Sweet Chili Mustard Sauce, Mongolian Peanuts, Lettuce Cups, and Rice Noodle Salad with House-Pickled Vegetables
Lucky Pig
Photography Credit: Antoinette Bruno via StarChefs
One of his signature dishes is Lucky Pig - it's currently on the lunch menu (did you think I'd tease you with something you couldn't have? Shame on you for thinking that.).

Want to wet your appetite some more? Follow his blog to see what he's up. He even gave a peek into what they considered for this fall's menus and what didn't make the cut.

We'll head south to Yountville, CA, a city that claims to have the highest Michelin star concentration in the world - 6 stars in just 6 blocks. (Depending on traffic this wine country stop is roughly half an hour to an hour away.) In a valley known for its grapes, Yountville celebrates its chefs. In addition, two Yountville restaurants, Bottega and Bistro Jeanty, are now included in Michelin's Bib Gourmand category. (Bistro Jeanty received a Michelin star from 2007 to 2009 and had been thought by Michael Bauer in December 2008, and contradicted by The Accidental Wino, to be coasting on its success. Michelin apparently agreed with Bauer taking the star away in 2010).

We'll be dining at two of their One Star restaurants - REDD for brunch and Etoile for dinner - and a restaurant in the Bib Gourmand category. 

Nick Ritchie
Image courtesy of StarChefs
Bottega, Yountville, CA
We'll also dine at Michael Chiarello's Bottega for Lunch (dress code is once again smart casual with dress jeans ok). Bottega opened in December 2008 and was just recently added to Michelin's 2011 Bib Gourmand list. 

This nod is not surprising as 28-year old Nick Ritchie, Chef de Cuisine at Bottega, was named by StarChefs as a Rising Star Chef in 2009. (Bottega was also a James Beard Semifinalist in the Best New Restaurant category in 2009.) Nick, like Brandon Sharp of Solbar, received his education at The Culinary Institute of America, Hyde Park, NY.

While a long-time fan of Michael Chiarello (I've been preparing NapaStyle recipes or adaptations of them for friends for almost four years), I'm extremely unimpressed with the restaurant's website. Press related to the restaurant hasn't been updated in forever and Nick Ritchie or his accolades are entirely absent.


If the front of the house is any indication of the quality of a restaurant, so far I'm not impressed with Bottega. Now granted Bottega is not a Michelin Star restaurant like Solbar or REDD. But then again JoLé isn't either. Sadly, no one at Bottega appears to pick up the phone or return messages.

If you're in the area for dinner with a group of 4 or more you can experience the Chef's Table - approximately $100 per person with wine pairing. Parties of 4 can join up with others for a communal dining experience and direct interaction with the chefs (a group of 6 to 12 and you can take over the entire table). As we were aiming to eat at as many Michelin star restaurants as possible and had limited time, we weren't able to squeeze in a seat at the Chef's Table. This is still on my Must Do list for the moment.


etoile, Yountville, CA
For dinner we may dress to the nines (dress code is smart casual - jeans definitely a no go here and jacket is suggested for dinner), and head over to Etoile for 7:30pm reservations. Of all the websites, I'm most impressed with Etoile's. Why? It identifies the entire culinary team. As a foodie I like knowing who's working behind the scenes and what their specialties are. Etoile like Solbar earned received its first Michelin star last year with the 2010 Guide and maintained it with this year's 2011 Guide.

Richard Reddington of REDD - Yountville, CA, 
Richard Reddington's passion for food and wine was sparked by his travels throughout Europe as a young adult and fueled by his experiences working in some of the worldÕs best kitchens. As Executive Chef at Redd, Yountville's highly anticipated new restaurant, he'll offer a contemporary interpretation of Wine Country cuisine, one that references his own classic French training and incorporates a variety of ethnic influences, reflecting his 15-year epicurean journey. His awards include 2003 San Francisco Magazine 'Best Rising Chef.'
Richard Reddington
Image courtesy of MarcoNews
REDD, Yountville, CA
REDD is on the outer edge of Yountville where Piatti's used to be (in the late 1990s Piatti's was a frequent stop on our way out of the wine country as parking was plentiful and it was slightly off the beaten path): 6480 Washington St, Yountville, CA 94599. I enjoyed Piatti's floor plan and open windows so I'm looking forward to seeing REDD's decor. Dress is business casual which according to Love To Know's Men's Fashion typically means no jeans, sneakers, or knits. As we'll be dining for lunch, dress jeans are probably ok.

REDD opened its doors in November 2005 and is one the oldest of the restaurants we'll be visiting on our honeymoon. 44-year old Executive Chef Richard Reddington earned his first Michelin star in 2008 with the 2009 Michelin Guide - three years after opening the doors - and has maintained that star for three years, including the 2011 Michelin Guide. He knows something about what it takes to earn and keep a star, having worked for two of France's 3 Star restaurants Arpege and Le Moulin de Mougins. 

Reddington is best known for food and wine pairings, crediting sommelier Larry Stone for turning the light on. So with our Brunch, we should try at least one of the recommended pairings if not a tasting menu (luckily dinner is in town so we could spend the afternoon exploring the town on foot). Additionally their Pastry Chef Nicole Plue was awarded Outstanding Pastry Chef by The James Beard Foundation in 2010. Dessert is a definite must have for us at this stop. 

Curious as to how we planned our mini-moon and why we waited a month? Here are the details:

Wednesday, November 17, 2010

Starry Starry Night in Chicago

I had my first amuse bouche in Chicago. At that same restaurant I was introduced to a chilled soup shooter. The food was sublime. The service was impeccable. It was my first time in Chicago.

Chicago, unlike New York, has been a city that when work looked for volunteers to staff a show my hand was the first one raised. At the time I didn't pay much attention to Michelin Stars. As someone who claims to be a foodie, I have a horrible secret to share. I didn't really follow Michelin Stars until I read Jay Rayner's The Man Who Ate the World: In Search of the Perfect Dinner. Until this month, there wasn't a Michelin Red Guide for Chicago.

Why do I bring up my first time in Chicago? My first introduction to amuse bouches? Because today's guide answered a riddle I'd been unable to solve. The riddle was simple. Why do I love Chicago? I love Chicago because I've never eaten a bad dinner there. In fact, every dinner I've eaten at Chicago where I chose the restaurant (there was one team dinner exception which I don't count as there was nothing I could eat on the menu) has been at a restaurant given at least one Michelin star or acknowledged in the Bib Gourmand category.

Are you curious which Chicago restaurant is begging me to return? The restaurant is Blackbird. I went there for my 34th birthday on the recommendation of a classmate who lived there. With the exception of the food and service at Blackbird, I had a horrible birthday. The staff went above and beyond to save the night and won my heart for Chicago.

Congratulations to all Chicago restaurants, but especially to those at which I've eaten. I look forward to dining in Chicago again soon.

Monday, November 15, 2010

Weigh In: Rethinking a Cookbook Design

Leading up to and following our wedding I started cleaning up all of our shared recipes (you may have noticed some of your favorites appearing here on this blog). Why? We were going to give cookbooks with recipes from meals we've shared to our guests as our wedding favors. They'd originally be put at each place setting. This drove a design that was coordinated with our wedding invitations, programs, etc. Time seemed nonexistent to work on editing so we pushed this DIY project out.

Next idea? We'd send the cookbooks to our guests as a unique thank you. Still our working plan. We'd envisioned that they'd follow personalized thank yous for gifts. Again we thought the design should be coordinate with our wedding - now to our Thank You notes.

But let's take a step back. Why do the favors need to be coordinated (aka "matchy matchy") with our wedding? We'd always planned on a vintage photo for the cover - us in 1950s era clothes with a 1940s stove. That's a consistent feel. So why not go a little further and design the insides of the cookbook with a retro feel? I love all things from the 1950s and have been playing with new Retro themes for this blog. (What got me thinking of a design overhaul was the look and feel of {this is glamorous}'s Table for Two series. Their theme is simple elegance - not Retro - but the way their blog and recipes complemented each other is what caught my eye.)

Weigh In: What do you prefer - (1) a cookbook that reminds you of a one day event - our wedding - or (2) a cookbook that ties to an ongoing blog?

Here are some layouts and design elements that have caught my attention for the blog (and for a retro cookbooklet design).
Retro 1950s OUTDOOR COOKING WITH REYNOLDS WRAP Recipes Tips - Vintage Cookbook - Advertising EphemeraRetro 1950s OUTDOOR COOKING WITH REYNOLDS WRAP Recipes Tips - Vintage Cookbook - Advertising Ephemera
Images courtesy of Cookbook Maven (Etsy)

1954 Modern Cake Decorating Book
Images courtesy of HiKoo (Etsy)

Vintage 1950s A Childs First Cook BookVintage 1950s A Childs First Cook Book
Images courtesy of Grandmother's Attic (Etsy)

13 Vintage Recipe Cards 1950s or 1960's
Image courtesy of The Old South Junker (Etsy)

Lot of 2 Vintage CookbooksLot of 2 Vintage Cookbooks
Images courtesy of Burgermeisterin (Etsy)

Friday, November 12, 2010

Family Style: Italian-Inspired Cuisine

Our first dinner hosted as newlyweds was a success! Timing worked out so that everyone was able to eat the entrée and rice fresh from the oven. Conversation flowed. Plates were scraped clean. Left overs were boxed and taken home. No one walked away hungry.

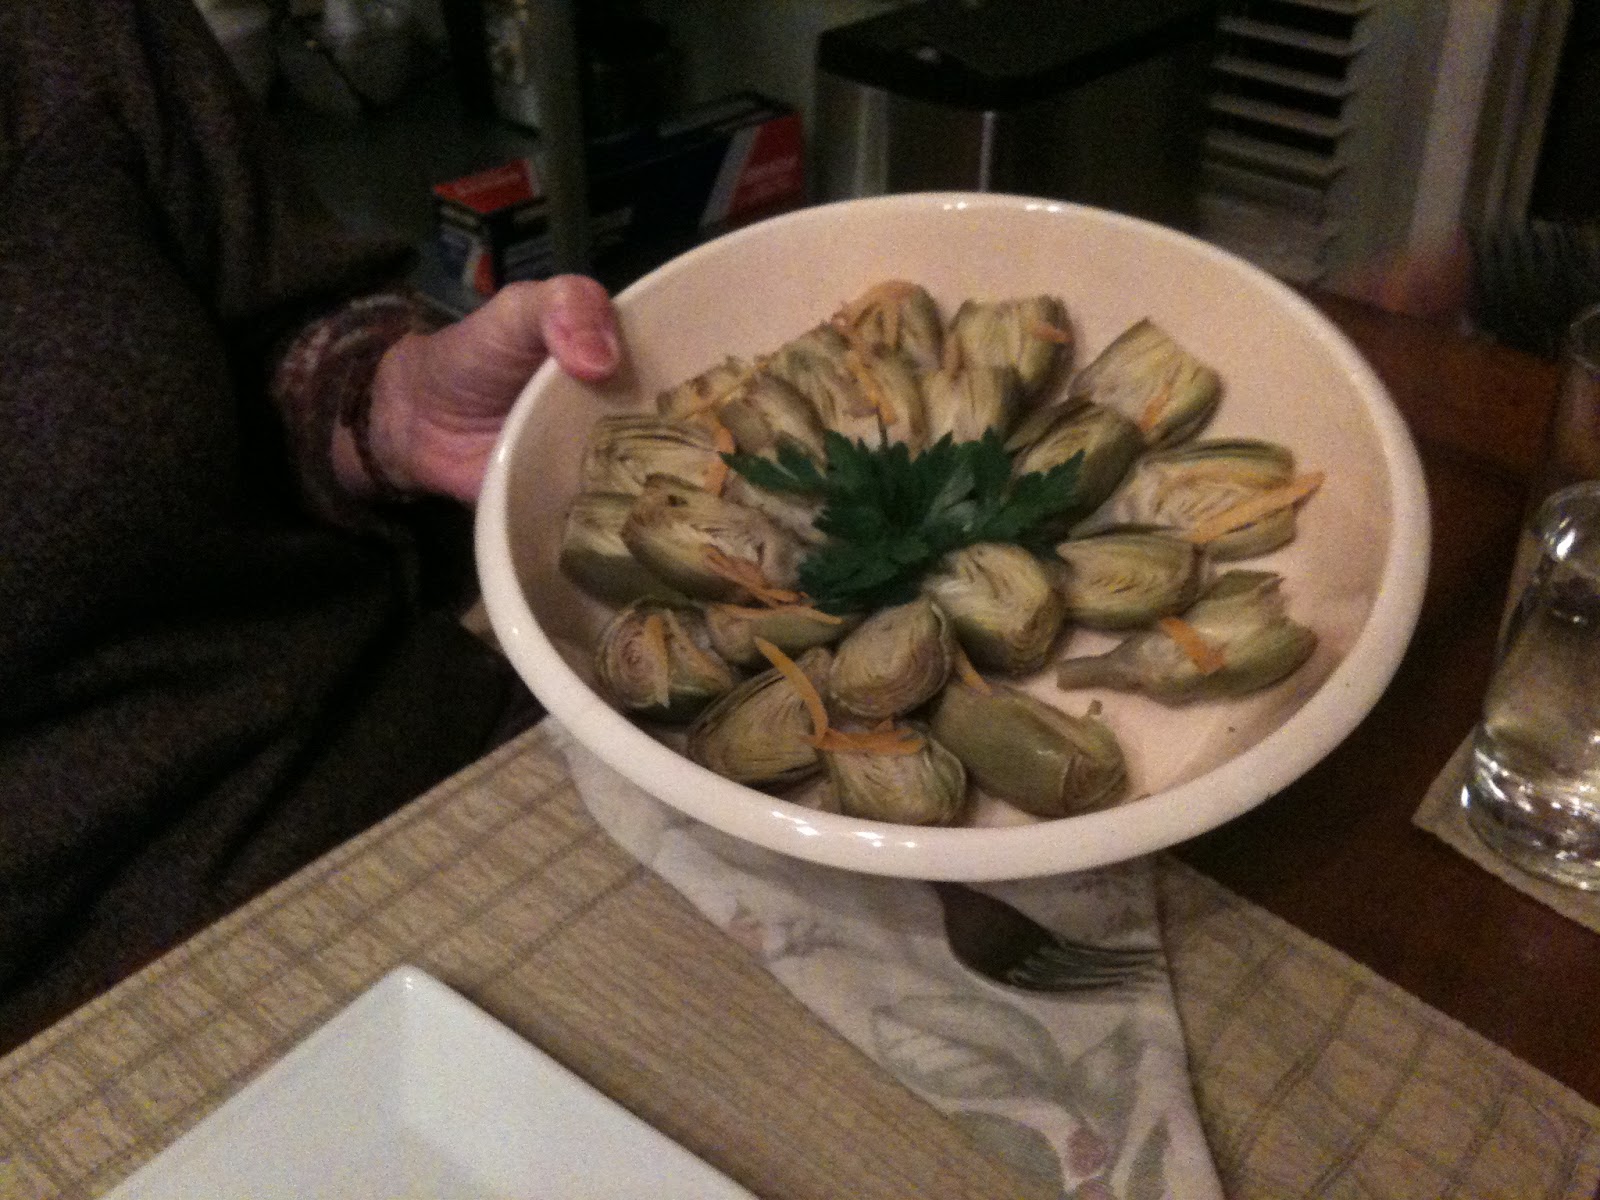
One appetizer that was a little tricky due to a few allergies was the bruschetta. But there was no need to worry, with fresh vegetables, herbs and bread, all of us were able to eat a panini that sang with flavor - even with some ingredients removed. The clams, while not a replica of Don Peppe's Baked Clams, plucked immediately from boiling water as they opened, were perfection - not rubbery as can happen when clams are overcooked - and devoured. The wild rice was moist. And the garlic for the chicken with lemon caper sauce was not brown!

Before we dive into details, a quick explanation of how we're going to be formatting Family Style posts. Each begins with an On the Menu section. Here you'll find the names of everything we ate. If it's a dish we've made before, you'll find a link to the recipe or the first family meal where we served the dish. (NOTE: Sometimes we don't like how a recipe turns out. You'll know if this is the case, because you'll find a "Take #" marker after the dish. For the original recipe follow the link, for the revised recipe, scroll down.) If it's a dish we made from someone else's recipe without modification, there will be a note about the online recipe or the cookbook referenced. For dishes loosely adapted from or inspired by, you'll see a bunch of referenced recipes.

Following the menu, you'll see come across the Preparation Notes section. This is how we pulled off the dinner using our kitchen - gas stove top with gas oven, pots and pans, knives, various kitchen electrics, and counter space limitations.

Recipes for any dish that we made for the first time at this family dinner appear next in the The Recipes section. Convenient Ingredient Lists so that you can check your pantry and fridge follow along with Necessary Equipment.

On the Menu
One thing about planning and hosting a dinner is that menus inevitably change. For us, we changed up the dessert. Everything else was what we announced on Monday

Bruschetta Panini
Baked Clams
Apple Apricot Persimmon Cake with Apple Persimmon Ice Cream

Preparation Notes
Coming soon

The Recipes
Bruschetta Panini
Loosely adapted from Capital Celebration: A Collection of Recipes by the Junior League of Washington's Goat Cheese and Tomato Salsa Bruschetta recipe, p.19
This recipe popped into my head the night we attended Crate and Barrel's Wedding Parties Registry event this past May. In fact, this recipe is the primary reason I had to have the Cuisinart Griddler GR-4N.

Ingredients
  • 2 Tbsp Fig Balsamic Vinegar
  • 4 Tbsp EVOO, divided
  • 2 Tomatoes, sliced in rounds
  • 2 Tbsp Earth Balance
  • 1 medium Onion, sliced
  • 1 Red Bell Pepper, sliced
  • 1 Yellow Bell Pepper, sliced
  • 1 Orange Bell Pepper, sliced
  • Fresh Basil, whole leaves, stems removed
  • Fiore Sardo, shaved
  • 1 Sourdough Batard, sliced 1/2 to 3/4-inch thick, paired
Instructions
  1. In a large ziplock bag, combine Fig Balsamic Vinegar and 2 Tbsp EVOO.
  2. Slice tomatoes.
  3. Add tomatoes to ziplock bag, shake until well coated.
  4. Place in refrigerator and marinade. 
  5. In saute pan, heat EVOO and Earth Balance on medium-high heat.
  6. When Earth Balance and oil start to sizzle, add onions.
  7. When onions have started to become translucent, add bell peppers.
  8. Saute until peppers are soft and onions are caramelized. Remove from heat.
  9. Preheat Griddler according to manufacturer's instructions.
  10. Brush outsides of paired bread with olive oil.
  11. Place two tomato slices, spoonful of bell peppers and onions, one to two basil leaves, and a few Fiore Sardo shavings on slice of bread.
    NOTE: If your slices of bread are thinner than 1/2 to 3/4-inch, sear sandwiches as soon as possible as tomatoes in balsamic vinaigrette will soak bread and make it difficult to remove from the Griddler.
  12. Top with other slice of bread.
  13. Press 2 to 3 sandwiches in Griddler until seared. Plate and serve immediately.
Baked Clams
Adapted from Food.com's and Food Network's Baked Clams recipes and Food Network's Baked Clams on the Half Shell Vongole Gratinate Al Forno recipe.

Two of the recipes called for splitting the clams prior to baking. As I'd heard and read that the best way to tell if clams are safe to eat is to only eat clams with shells that have opened, I started with a recipe that first boiled the clams. The Reluctant Gourmet has a Clam Guide that includes a great write up on the differences in clams as well as how to store and prepare them.

Ingredients

  • 3 pounds Littleneck clams, well scrubbed, hard shell
    NOTE: Select clams with smaller diameters as they are younger and tend to be more tender and sweeter tasting.
  • 1 cup Cornmeal
  • 2 Garlic cloves, minced
  • 1/4 cup Parsley, finely chopped
  • 1 cup Bread Crumbs
  • (Optional) 1/2 cup Pecorino Romano, grated
  • 2 Lemons, zested and juiced
  • 1/2 cup EVOO

Instructions

  1. Rinse clams several times and place in a bowl of water with cornmeal added.
  2. Store in the coldest spot in your refrigerator until ready to boil.
  3. Bring a saucepan of water to a boil.
  4. Add clams. Toss out any clams that are already open.
  5. Boil until the shells open, approximately 5 minutes. Remove clams that have opened immediately from the water. 
  6. In a bowl, blend Garlic, Parsley, Bread Crumbs, Pecorino Reggiano, and Lemon Zest.
  7. Drain clams, and when cool enough to handle, remove empty half of the shell from each one.
  8. With a fork, stir Lemon Juice and EVOO into the Garlic Bread Crumb mixture. It should be moist but not oily. Set aside.
  9. Adjust rack in oven so that clams will be 4 inches from the heat source.
  10. Preheat broiler.
  11. Place clams on a baking sheet. 
  12. If clams rock back and forth, add rice under them to stabilize the shells.
  13. Spread about a teaspoon of the mixture atop each clam in a shell. The filing should be about 1/8 inch thick.
  14. Broil clams until lightly browned, about 3 to 4 minutes.

Chicken with Lemon Caper Sauce - Take 2
This recipe was adapted from Sparow64's, Taste of Home's, and Fitness Magazine's Chicken with Lemon Caper Sauce recipes, as well as TLC's Chicken Scallopini with Lemon-Caper Sauce recipe. Unlike the first attempt, we used a mix of Earth Balance and EVOO as suggested in Food Network's Chicken Piccata recipe and changed the order of chicken and garlic preparation to prevent the garlic from overbrowning.

Ingredients (Serves 6)
  • Pinch of Salt (1/4 tsp, approximately 4 turns of our Salt grinder) and Pepper (1/16 tsp, approximately 2 turns of our Pepper mill)
  • 1/2 cup All-Purpose Flour
  • 6 (5 to 6 ounces each) Skinless, Boneless Chicken Breast halves
  • 6 Tbsp Earth Balance, divided in thirds
  • 5 Tbsp Del Papa, Cold Pressed EVOO
  • 1/2 cup Gnarly Head Pinot Grigio, or Dry White Wine
  • 3 Garlic cloves, minced
  • 1 Tbsp Cornstarch
  • 3/4 cup Fresh Lemon Juice (3 medium size lemons)
  • 2 Tbsp Earth Balance
  • 3 Tbsp Agostino Recca Capers in Salt, rinsed and drained
  • 4 Tbsp Fresh Parsley, chopped
  • Lemon slices
Instructions
  1. Preheat oven to warm or 200 degrees.
  2. In 1-gallon ziplock bag, add salt, pepper, and flour. Shake until well mixed.
  3. Juice four small or three medium-sized lemons, approximately 3/4 cup lemon juice.
  4. Whisk the cornstarch and the lemon juice until smooth. Set aside.
  5. Place chicken breasts, one at a time, between sheets of wax paper. Pound to 1/4-inch thickness.
    NOTE: A marble rolling pin doesn't really work for this application. You really do need a meat tenderizer. We'll have a TIPS post in the next couple of weeks as we're going to get one.
  6. Add chicken to salt, pepper, and flour mixture, and shake bag until chicken is well coated.
  7. In a saute pan (we used our 12" Everyday Pan as we don't own any saute pans) melt 2 Tbsp Earth Balance and 3 Tbsp EVOO over medium-high heat.
    NOTE: Do not use a nonstick pan.
  8. Shake excess flour from chicken and with tongs place 3 pieces of chicken into pan when Earth Balance and EVOO starts to sizzle.
  9. Brown chicken in hot EVOO until both sides are golden-brown, approximately 3 to 4 minutes per side or until a meat thermometer reads 170 degrees.
  10. When chicken is done, inside is white and firm, remove from pan to baker. Cover with foil and place in oven to keep warm.
  11. Melt 2 more Tbsp Earth Balance and 2 Tbsp EVOO over medium-high heat.
  12. Shake excess flour from chicken and with tongs place remaining chicken into pan when Earth Balance and EVOO starts to sizzle.
  13. Add the remaining 2 Tbsp Earth Balance and stir until melted.
  14. Cook garlic over medium-high heat for 1 minute.
    NOTE: Do not let the garlic brown.
  15. Pour white wine into the pan and allow to boil.
  16. Stir continuously until the drippings from the chicken are incorporated.
  17. Add the cornstarch and lemon juice mixture to the white wine sauce.
  18. Allow to return to a boil.
  19. Cook and stir for a few minutes until the sauce has thickened. Remove from heat.
  20. Stir in capers and parsley.
  21. Return the chicken to the pan, turning to coat.
  22. To serve, plate the chicken, pour lemon-caper sauce over each breast, and garnish with lemon slice.
Ingredient Lists
From Our Pantry

  • 1 cup Wild Rice and Brown Rice
  • 1 cup Bread Crumbs
  • 1/2 cup All-Purpose Flour
  • 1 cup Self-Rising Flour
  • 1 cup Cornmeal 
  • 1/3 cup Maple Sugar Crystals
  • 1 cup Dried Apricots
  • 1/4 cup Almonds, slivered
  • 1 Tbsp Corn Starch
  • 3 Tbsp Agostino Recca Capers in Salt
  • 2 Tbsp Fig Balsamic Vinegar
  • 1 cup + 2 Tbsp EVOO
  • 3 cups Chicken Broth
  • 1 medium Onion, sliced
  • 5 Garlic Cloves
  • 5 medium Lemons
  • 1 tsp Baking Powder
  • 1/2 tsp ground Allspice
  • 1 tsp ground Cinnamon
  • 1 tsp Vanilla 


From Our Refrigerator

  • 1 cup Earth Balance
  • 2 Eggs, lightly beaten
  • (Optional) 1/2 cup Pecorino Romano
  • 1/4 lb Fiore Sardo, shaved

From the Grocery 

  • 4 Honey Crisp apples
  • 4 Fuyu persimmons
  • 2 Heirloom Tomatoes, sliced in thin rounds
  • 1 medium Red Bell Pepper, quartered and sliced
  • 1 medium Orange Bell Pepper, quartered and sliced
  • 1 medium Yellow Bell Pepper, quartered and sliced
  • 3 Green Onions, roughly 2 Tbsp, chopped
  • Fresh Basil, whole leaves, stems removed
  • 1/2 cup Fresh Parsley, chopped
  • 8 oz Shiitake mushrooms, sliced
  • 1 Sourdough Batard, sliced 1/2 to 3/4-inch thick
  • 6 (5 to 6 ounces each) Skinless, Boneless Chicken Breast halves
  • 3 lbs Littleneck clams, well scrubbed, hard shell
    NOTE: Select clams with smaller diameters; they are younger and tend to be more tender and sweeter tasting.
Necessary Equipment
  • 2 to 4 - 1 gallon Ziplock bags
  • Measuring spoons
  • 2-cup Measuring cup
  • 10-cup Measuring cup
  • Sifter
  • 2 - Small Bowls
  • Medium Bowl
  • Prep dishes
  • Paring knife
  • Tomato knife
  • 8-in Chef's knife
  • Bread knife
  • Chef'n FreshForce Citrus Juicer (review)
  • Meat tenderizer
  • Spatula
  • Tongs
  • Pastry brush
  • Blender or food processor
  • Cuisinart ICE30-BC Ice Cream Maker
  • Cuisinart Griddler GR-4N
  • Toaster oven
  • Instant read thermometer
  • 8x8 square baker
  • 1 small saucepan
  • 12-in non-stick skillet
  • 12-in Everyday Pan or saute pan
  • 3-qt covered chef's casserole, oven safe
  • 7-qt covered chef's casserole
  • Wire rack
  • Cookie sheet